Returns are part of running any online store. Whether a customer ordered the wrong size or simply changed their mind, how you handle it says a lot about your brand. A smooth return experience builds trust. A confusing one pushes customers away for good.
The good news? Shopify makes it fairly simple to manage Shopify return labels — as long as you know what’s available, what’s not, and what to do when you hit a wall. This guide walks you through everything: how to create a return label on Shopify, when you can’t (and why), what it costs, and how to handle returns that fall outside Shopify’s native setup.
What Is a Shopify Return Label?
A Shopify return label is a prepaid shipping label that lets your customer send an item back to you — without paying out of pocket at the post office.
There are 2 ways this works in Shopify:
- You buy the label directly inside the Shopify admin — Shopify generates a return shipping label through a supported carrier, and you send it to the customer via email or a link.
- You upload a label you created elsewhere — You generate the label through a carrier portal or a shipping app, then attach it inside Shopify’s return flow.
Both options live inside the same return workflow in your Shopify admin. The key difference is where the label actually comes from.
Shopify Return Label Requirements: Who Can Use the Built-In Option?
Before you try to create a return label in Shopify, you need to know one important thing: the native label purchase feature is only available for U.S. domestic orders.
That means if your store ships internationally — or if you fulfill from outside the United States — you won’t see the option to buy a label inside Shopify. You’ll need to use the upload method instead (more on that below).
Here’s a full list of requirements for the built-in Shopify return label feature:
- Your store must be based in the United States
- The order must have at least one fulfilled item
- The return address must be a valid U.S. street address — not a PO Box
- The destination address must be a U.S. address (no international, no APO/FPO/DPO military addresses)
- Some U.S. territories that require customs forms are also excluded
If all of those boxes are checked, you’re good to go.
Here are the supported carriers for Shopify return labels. Shopify works with:
- USPS — Priority Mail and Ground Advantage, with up to $100 of included coverage
- FedEx — Both the sender and recipient phone numbers are required
- UPS — Only available if you connect your own UPS account; UPS bills you directly
If UPS doesn’t appear as an option, it’s because your UPS account hasn’t been connected yet. USPS and FedEx are available by default.
How to Create a Return Label on Shopify (Step-by-Step)
Method 1: Buy the Shopify return label directly
Once you’ve confirmed your order is eligible, here’s exactly how to create a return label on Shopify:
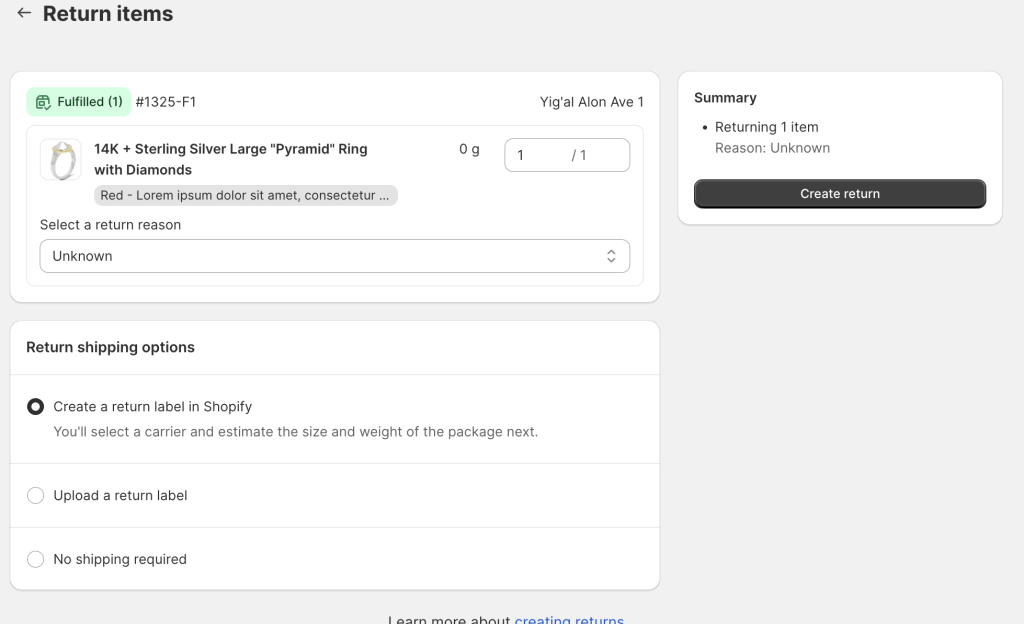
- Go to Orders in your Shopify admin
- Open the order you want to process
- Click Shipping labels and enter the quantity of items being returned
- Under Return shipping options, select Create a return label in Shopify
- Click Create return
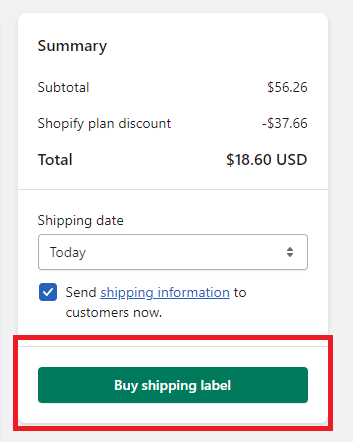
- Choose your Return to address from your saved fulfillment locations
- Enter the package weight and dimensions
- Select a shipping service (USPS, FedEx, or UPS if connected)
- Click Create return label
- Send the label to your customer — you can Email customer, Copy link, or Print label
That’s the full flow. It takes a few minutes once you’ve done it once or twice.
After the label is created, your customer gets an email with instructions. They pack the item, print the label, attach it to the box, and drop it off at the carrier.
One thing to know: Shopify doesn’t show a “Delivered” tracking status for return labels inside the admin. To check where a return shipment is, you need to check the carrier’s tracking page directly using the tracking number.
If a customer says they never got the label, or they deleted the email, you can resend it. Go back to the order, find the return, and look for the option to resend the label via email or copy the link again.
Method 2: Upload a Return Label in Shopify
If you can’t buy a label through Shopify — whether because of international shipping, excluded addresses, or carrier issues — you can upload one instead.
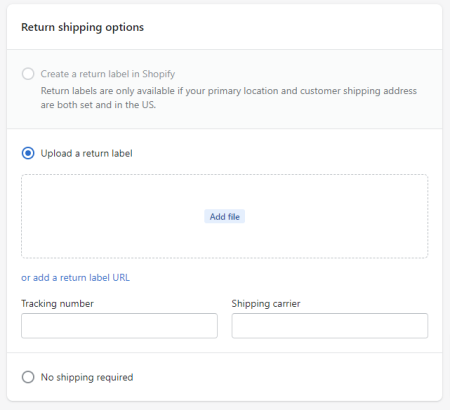
Here’s how it works:
- Create the label externally (through a carrier portal, a shipping app, or a third-party tool)
- When creating the return inside the Shopify admin, choose Upload return label instead of the built-in purchase option
- Upload the label as a PDF or JPEG, or paste in a return label URL
- Optionally add the tracking number and carrier name
This keeps everything organized inside Shopify’s return record, even when the label itself comes from somewhere else.
This is also the best approach for international returns. Since Shopify’s native label purchase is U.S.-Only, merchants shipping to Europe, Australia, Canada, or anywhere else need to generate labels through their carrier account or a third-party platform and then upload them here.
Method 3: Automating Return
Here’s a situation a lot of Shopify merchants know too well.
A customer emails asking how to return an order. You check the order, create a label manually, copy the link, paste it into an email, send it — then wait. A few days later, the same customer emails again because they lost the link. You do it all over again. Multiply that by ten orders a week, and suddenly, returns are eating hours you don’t have.
And it’s not just the time. Manual returns create mistakes. Wrong labels, missing tracking numbers, and refunds processed before the item even arrives back. One bad experience is enough to lose a customer permanently — and in a world where people share reviews publicly, one unhappy customer can cost you more than just a sale.
That’s exactly the problem Synctrack Returns & Exchanges is built to solve.
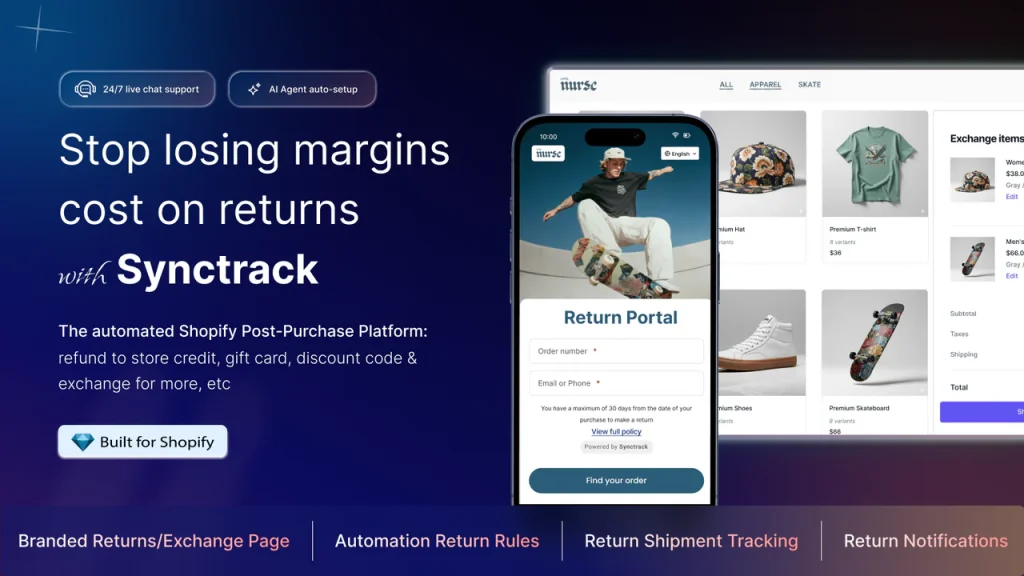
Synctrack is a return management app for Shopify that puts the entire returns process on autopilot. Instead of handling every return by hand, you set your rules once — and the app takes care of the rest.
Here’s what it does:
- Self-service return portal – Customers submit and track their own return requests without emailing you
- Automatic return label generation – Synctrack integrates with 2,900+ carriers (including FedEx, Shippo, Sendcloud, ShipStation, Australia Post, and EasyPost) to generate labels automatically
- Return shipment tracking – Customers can track their return status directly through the self-service portal, so they stop emailing you asking “Did you get my package yet?”. Learn how return tracking works here
- Smart automation rules – Set custom return policies and approval workflows so the app handles routine cases without any input from you
- Shopify sync – Return orders and statuses update automatically inside your Shopify admin, so everything stays in one place
This is especially useful for merchants who ship internationally. Since Shopify’s built-in label purchase only works for U.S. domestic orders, Synctrack fills that gap with carrier integrations that work across borders.
If you’re spending more than a few minutes a day on returns. Stop. Our merchants like Soeju have cut their return processing time by 80% with Synctrack – handling more requests in less time, with fewer refunds slipping through. If you’re spending more than a few minutes a day on returns, the math works in your favor quickly.
Shopify Return Label Cost: How Much Do You Pay?
Shopify doesn’t charge you the moment you create a return label. Instead, it uses pay-on-scan billing — you only get charged after the carrier scans the package at drop-off.
Once that happens, the charge shows up on your Shopify billing account. It’s invoiced either when you reach your billing threshold or on your regular monthly billing date.
But that’s not all. Your final cost might be different from the estimate. Because Shopify shows you an estimated price when you create the label. But the amount you actually pay can be different. Here are the main reasons:
- The carrier weighs and measures the real package after scanning it
- If the actual weight or size doesn’t match what you entered, the price changes
- Large but light packages may be charged by size, not weight — this is called dimensional weight pricing
- USPS, FedEx, and UPS each send billing data on their own schedule, so the charge might not show up right away
The fix is simple: always enter the correct weight and dimensions before creating the label. That’s the easiest way to avoid surprise charges.
Our notes for a few more things to know about the Shopify return label costs:
- USPS labels come with up to $100 of included coverage. You can’t add more insurance on top of that for Shopify-purchased labels. If you need more coverage, buy the label directly through USPS or use a third-party shipping platform.
- UPS labels work differently — UPS bills you directly through your own UPS account, not through Shopify.
- Insurance claims for lost or damaged return shipments have to be filed directly with the carrier. You can’t do it inside the Shopify admin.
FAQs About Shopify Return Label
Why I Can’t Create a Return Label in Shopify
There are a few common reasons:
- No fulfilled items — The order hasn’t been marked as fulfilled yet. Fulfill the items first.
- International address — Shopify’s built-in label purchase doesn’t work for non-U.S. destinations.
- Military address (APO/FPO/DPO) — These are excluded even though they have U.S. ZIP codes.
- Invalid return address — Your fulfillment location address may have a formatting issue or be a PO Box.
- No carriers displayed — Check your package weight and dimensions. USPS has a max weight of 70 lbs and a combined length + girth limit of 108 inches.
If you’ve ruled all of that out and still see a system error, try these fixes:
- Wait 15 minutes and try again
- Remove any special characters or emojis from addresses
- Clear your browser cache or try a different browser
- Validate your address at usps.com
Still stuck? That’s when the upload method becomes your best friend.
Can I Charge Customers for the Return Label?
No. Not automatically.
When you buy a return label through Shopify, the cost goes straight to your Shopify account. There’s no built-in option to pass that cost to your customer. If you want to recover it, you have to manually deduct the label cost from their refund when you process it.
Want to charge a set fee for return shipping instead? You can do that through your return rules — we’ll cover that in the next section.
Can I create a Shopify return label for international orders?
No. Shopify’s built-in return label purchase is only available for U.S. domestic orders. For international returns, you’ll need to create a label through a carrier portal or returns app and upload it into Shopify.
Why don’t I see “Create a return label in Shopify”?
The most common reasons are: no fulfilled items on the order, a non-U.S. address, a military address (APO/FPO/DPO), or an invalid return address. Check each of these first.
Can I cancel a return label?
No. Because of pay-on-scan billing, return labels can’t be voided. But if the label is never used, it expires and you won’t be charged.
Can I create more than one return label per order?
Yes. If a customer is returning multiple packages, you can create a separate label for each one.
How do I track a return shipment?
Shopify admin doesn’t show a “Delivered” status for return labels. To check where a return shipment is, use the tracking number on the carrier’s website directly.
If you use Synctrack Returns & Exchanges, your customers can track their return status through the self-service portal — so they’re not emailing you to ask where things stand. Return statuses also sync automatically with your Shopify admin, giving you a cleaner view of all open returns in one place.
Final Thoughts
Managing returns well is one of those things that quietly builds customer loyalty over time. When it’s easy for someone to send something back, they’re much more likely to buy from you again. Start with the basics: set up your return rules, write a clear return policy, and use the native label flow for eligible orders. But if you already have a growth store, consider adding a returns app like Synctrack to streamline the process even further.