Shipping labels seem like a small detail, but they shape your margins, your fulfillment speed, and how customers feel when a package shows up at their door. Shopify shipping labels let you buy, print, and track carrier labels straight from your store admin, no jumping between carrier websites or pasting tracking numbers into spreadsheets.
That said, the carriers, rates, and rules depend on your country, your plan, and even your printer. Use the wrong paper format, and you’ll waste ink on a cropped label. This guide covers how to create, print, and save on Shopify shipping labels, plus the slip-ups to avoid. Let’s get into it.
A Shopify shipping label is a carrier label you buy and print right inside your Shopify admin. It includes the customer’s address, your return address, the carrier service, the package weight, the ship date, and a barcode that the carrier scans.
Once you buy the label, Shopify adds the tracking number to the order on its own. Your customer gets the update, and your records stay clean.
Why do merchants use this instead of going to a carrier’s website? Two reasons. It’s faster, and the rates are usually cheaper. Shopify gets volume discounts from carriers and passes the savings to you.
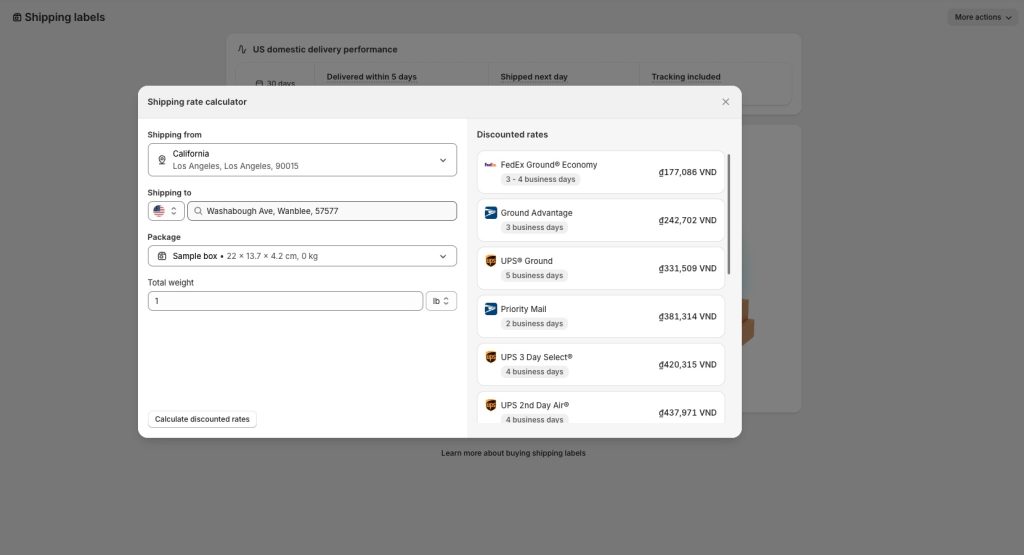
Here’s the full process in simple steps:
Tracking syncs to the order on its own. If something goes wrong, you can reprint an unused label or void it and start fresh.
How much you save depends on your plan, the package, the weight, and where it’s going. Most merchants on paid plans see real savings on everyday shipments.
Here’s the part most merchants get wrong: Shopify doesn’t charge you a dime for the label itself. You only pay what the carrier charges, like USPS, UPS, or DHL. The bonus? Shopify already cut a deal with these carriers, so you get discounts of up to 88% off what you’d pay anywhere else.
So the real question isn’t “how much is the label?” It’s “how much does the carrier charge after Shopify’s discount?”
Let’s say you’re shipping a 1-pound package inside the US. Here’s what to expect:
For light stuff, USPS almost always wins on price. For anything heavy, UPS usually pulls ahead.
This is the part nobody talks about. Your shipping discount depends on which Shopify plan you’re on. The higher the plan, the deeper the discount.
Let’s ship a 5-pound box from New York to Chicago and see what happens:
Same box. Same route. The only thing that changed is which plan the store is on.
Honestly? It depends on how much you ship.
Moving from Basic to Grow saves you roughly $0.80 to $1.20 per package. That’s pocket change in one order. But ship 500 orders a month, and you’re suddenly saving $400 to $600, just on labels.
That’s often enough to cover the cost of the upgrade itself. So if your store is growing fast, the math usually works in your favor.
Even with a great discount, a few things still affect what you pay:
The “up to 88% off” is the best case, not what you’ll get every time. Your real savings depend on the package weight, the distance, and the service. Also, the discount only works through Shopify Shipping. If you use your own UPS or FedEx account, you’ll get whatever rates you negotiated with them.
Shopify gives you a few ways to make shipping labels. You can use your computer, your phone, or buy a bunch of labels at once. Pick the way that fits how you work.
Before you start, set up a couple of things so you don’t repeat the same info on every order. Go to Settings > Shipping and delivery > Packages. Add the box or mailer you use most, and set it as your default. Also, check that every product has the right weight on its page. Shopify uses that weight to show you rates and charge for the label.
This is the easiest way to start. Open an unfulfilled order in your admin and click Create shipping label. Check that the items, weight, and box look right. If you’re using a different box this time, change it here.
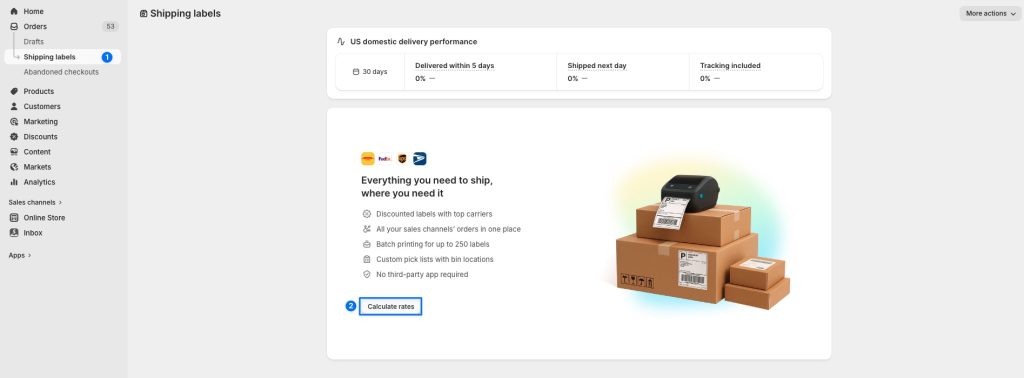
Then pick a carrier. Shopify shows you each one’s price and delivery time side by side, so you can pick the cheapest or the fastest. Click Buy shipping label, and you’re done. Print it now, or print it later from the Shipping labels page.
A few things to know:
The Shopify app does the same thing in a few taps. It’s handy when you’re packing away from your computer.
Open the app, tap Orders, and tap the one you want to ship. Tap Create shipping label, check the items and weight, and pick a carrier. Tap Buy shipping label, then Print shipping label to send it to your printer.
If you’re on Android with Chrome, the label might download to your phone first. Just open it from your Downloads folder and print.
Got a stack of orders to ship? Bulk buying saves time. Shopify lets you buy up to 250 labels at once.
Go to Orders or the Shipping labels page. Pick the orders you want to ship, then click Create shipping labels. Shopify shows you the rate and service for each one. Look for any red flags on the screen, fix them, and confirm. After that, print up to 100 labels at a time.
Most bulk errors come from missing weights, missing box sizes, or bad addresses. Fix those in your product data and checkout, and bulk runs go fast.
Shipping abroad? You’ll need to add customs info before the label prints. That means:
Keep the total under $2,500 per label. Vague descriptions cause delays at the border, so write in plain words.
You’ll also see two shipping options:
DDP costs more, but customers love it. Fewer surprise bills mean fewer refused packages and fewer angry emails.
>>> Learn more: Adding HS codes to your products
Printing trips up more new merchants than buying does. The label format must match your printer. If they don’t match, the label gets cropped, the barcode fails to scan, or the carrier rejects the package at intake.
Shopify supports 3 print formats:
Pick the format that matches the paper in your printer. If you load 4 x 6 thermal labels in a Zebra or Rollo printer, choose Thermal. If you print on a regular office printer with standard sheet paper, choose Letter or A4 based on your country.
Didn’t print the label right away? No problem. You can come back later from the Shipping labels page.
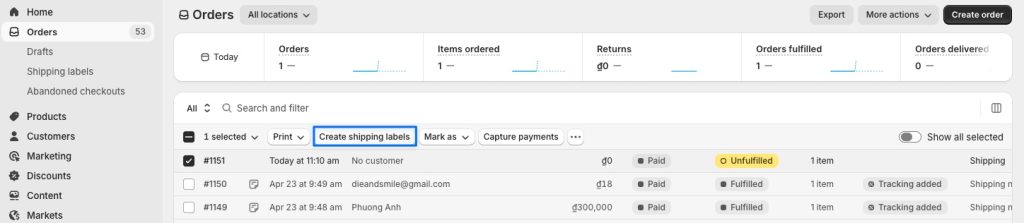
Go to Orders > Create Shipping labels, pick the labels you want (up to 100 at a time), and click Print documents. Choose what you need: shipping labels, packing slips, or customs forms. Pick your paper size and hit Print.
One thing to watch for: if your batch has labels in different sizes, Shopify opens them as separate PDF files. Your browser’s pop-up blocker might stop one of them from opening. To fix that, allow pop-ups for your Shopify admin domain. You can buy up to 250 labels in one batch, but Shopify caps each print job at 100 labels – large batches will require multiple prints.
How you print depends on the device you’re using.
Desktop. The print box opens in your browser. Pick the right paper size and the right printer. If you have both a thermal and a regular printer hooked up, double-check which one is selected before you click Print.
iPhone. The Shopify app sends the label to your AirPrint printer. Don’t see your printer? Make sure your phone and your printer are on the same Wi-Fi.
Android. The label usually downloads to your phone first. Open it from your Downloads folder or your notification bar, then print. If your printer isn’t set up on your phone yet, add it through your Android print settings.
Mistakes happen. The printer jams, the address is wrong, or the customer asks to change something. Here’s what to do.
Reprint. If the label hasn’t shipped yet and the info is still right, just print it again from the Shipping labels page or the order page. Don’t reuse a label you already gave to the carrier. The barcode only scans once.
Download. Shopify opens labels as PDF files when you print. If you want a copy for your records, save the PDF from your browser’s print box.
Void. Got the wrong address, wrong box size, or wrong service? Void the label from the Shipping labels page or the order page, then make a new one with the right info. Heads up: some labels can’t be voided. USPS First-Class Mail, for example, isn’t refundable, so double-check before you click Buy.
Printing the label is only half the job. Once the package leaves your hands, a new problem starts: keeping the customer updated.
Here’s what usually happens. You ship the order. A few days go by. Then the emails start coming in. “Where is my order?” “Has it shipped?” “Why isn’t the tracking updating?” You answer the same questions over and over. It eats up your day.
It gets worse during busy seasons like BFCM. One late shipment turns into five support emails. A package stuck at customs turns into a refund request. Customers don’t know what’s going on, so they think the worst. They lose trust. Your inbox turns into a tracking helpdesk.
And the tracking link from the carrier? It looks bland. It sends your customer to a generic carrier page, right when they’re most excited about the package. Your brand disappears from the moment that matters most.
This is where Synctrack Order Tracking comes in. This app turns tracking into a hands-off part of your store. Every order gets a branded tracking page that lives on your domain, so customers come back to your store, not a carrier site, when they check on their package. Real-time updates flow in automatically, and email and SMS notifications keep customers in the loop without you typing a single reply.
Behind the scenes, Synctrack does the heavy lifting:
The result? Fewer “Where is my order?” emails, happier customers, and a post-purchase experience that feels like part of your brand instead of a hand-off to a carrier.
You can start free with up to 20 orders a month, then move to the Launch plan at $9/month when you want CSV exports, analytics, and upsell features. For growing stores, the Scale and Pro plans add higher order limits and priority support.
If you’re already saving time on the buying side with Shopify shipping labels, Synctrack closes the loop on the customer side. Print the label, hand off the box, and let Synctrack handle the rest.
When people search for “Shopify shipping label template,” they usually mean one of two things. Some want to redesign the label with their brand colors and logo. Others want a blank label they can fill in by hand or in another tool. The answer depends on which one you’re after.
Carrier labels aren’t templates you can redesign. Shopify says the label layout depends on the carrier and the service you pick, and you can’t edit the label itself. Every carrier has strict rules about where things go, how the barcode looks, and how the label scans at pickup. If you redesigned a USPS or UPS label, the carrier would reject the package.
What you can change is everything around the label:
Want to add your brand to the unboxing? Skip the label and focus on the packing slip and the box. The packing slip is the perfect place for a thank-you note, a discount code, or a “leave us a review” message. It won’t break any carrier rules.
Shopify works with thermal label printers from DYMO, Zebra, Brother, Rollo, and Bixolon, plus any regular desktop printer.
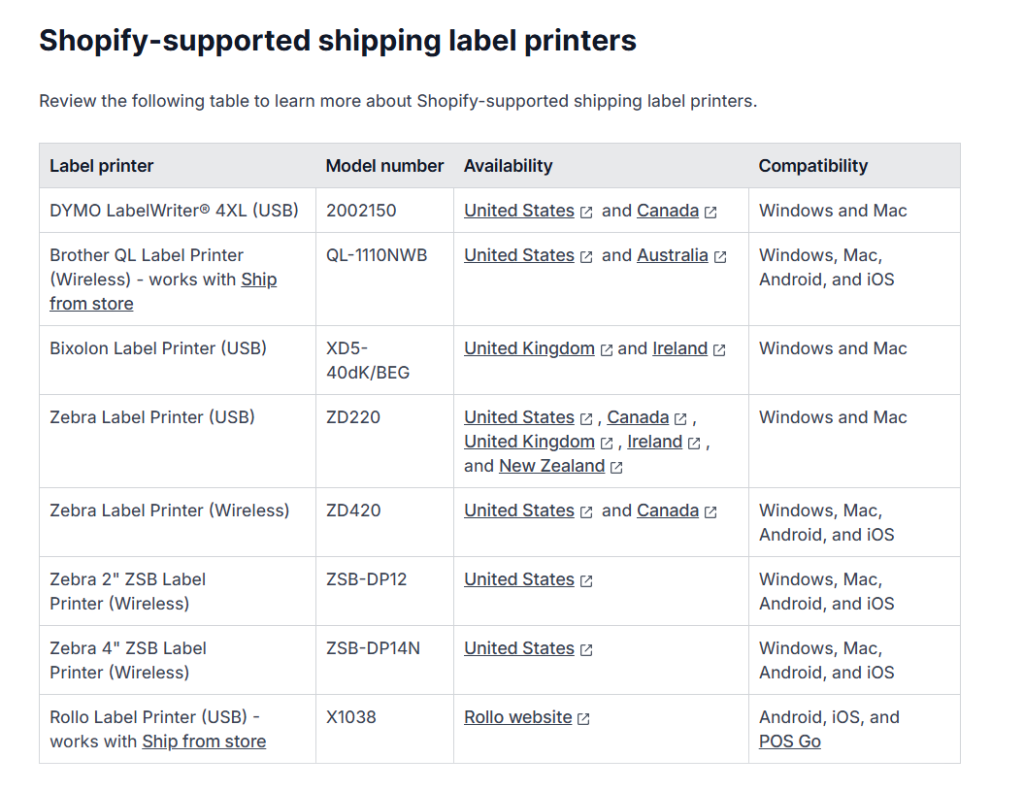
If you ship more than a few orders a week, a thermal printer is worth it. No ink, no cutting, and the labels come out clean every time. It pays for itself fast.
Here’s what to know about each setup:
The most common print problem? A label that comes out cropped or stretched. The cause is almost always a format mismatch. The fix is simple: pick the format on the print page that matches the paper in your printer.
If you have already closed the print page and the format is wrong, you can’t switch sizes. You’ll have to void the label and buy a new one.
A few notes on PDFs:
Shipping shouldn’t be the part of the day you dread. Shopify shipping labels takes a chore that used to eat hours and turns it into a few clicks, with fewer mistakes and better rates along the way. Try it on your next order. Click Create shipping label, pick a service, and print. You’ll wonder why you didn’t switch sooner.